Select and select the face for the sketch. Start in an active part sketch.

Inventor How To Insert Image In Drawing Youtube
On the ribbon 3D Model tab Sketch panel click Create 2D Sketch and then click the planar face or work plane to set.

. A dialog box will pop up select Paintbrush Picture click OK. Open the AutoCAD software by clicking on the AutoCAD icon provided as a shortcut on your windows. You can edit the size of your image with the use of dimensions and also constrain your image to the centre point with the use of constraints.
That will create an embedding. If the source file is ever moved or deleted the x-ref will be unresolved the image will not appear. You can save the image as jpg jpeg or gif.
Or CTRL V keyboard command to paste the image into AutoCAD as an embedded OLE object. Click Insert and then select Insert Image. Click Insert and then select Insert Image.
Simply click the OK button to close. Click Insert tab References panel Attach. Click corners to pivot the image.
Process 1 Step 1. Browse to your image and select. Click in the graphics window to.
This is were you will navigate to your reference image on your computer and insert it in to the plane you have selected. The process starts in an Inventor Sketch. Start in a drawing sketch.
In the Open dialog box browse to the folder where the image file is located and then click Open. Click the drawing sketch. Select the ACAD on the Insert Panel.
I have my Inventor application open and I am working on the first sketch of my part. I will use the Image command to select and insert the desired digital image. In the Image dialog box use one of the following methods.
The background part colour will now be visible through the transparent section of the image. Click on the image icon at top right hand side of your ribbon. 5202015 Open your Autocad file that image needs to go into.
About Press Copyright Contact us Creators Advertise Developers Terms Privacy Policy Safety How YouTube works Test new features Press Copyright Contact us Creators. Answered on 5 Jun 2013 0859 PM Answer as a tutorial. The empty background and borderes can be cropped.
In the Insert Object dialog box choose the options to achieve the desired result. However x-referencing certainly has its limits. Step 2.
We want only the required portion in the image. To create a file select the object type and select Create New. Click Insert and then select Insert Image.
Images can only be placed into sketch mode Select Image from the Insert panel of the Sketch tab on the Ribbon. The Import Options menu pops up if there were multiple layers in the imported drawing you can select which of the layers you want to bring across Click Next to view more options. Then press on the DWG folder appearing on.
Open your Autocad file that image needs to go into. This launches Paint to edit an image that is embedded inside AutoCAD. Once image file is open in Paint on your keyboard Ctrl A together shortcut to Select All then press Ctrl C shortcut for Copy to Clipboard 2.
On the Insert Object window click Create New. Click the image and drag to move it horizontally or vertically. Step 3.
The best you could do with Inventor is to draw an empty box border in the sketch attaching all relevant notations to this box. Crop the image to eliminate clutter. The application for the object type opens so that you can create the object.
Start in a drawing sketch. Click the drawing sketch. You can link the image to the part file but in this case I will clear this default option and embed the image.
But how about we engineers who use AutoCAD. Click an edge to. For Symbols or other general images in drawings you have to be in a Sketch mode first and then use the above technique to place it in.
Select Sketch ribbon tab Insert panel. You are then placed into sketch mode where you can make edits to the title block. Here is how you insert image in AutoCAD and draw over it.
Browse your computer and find the drawing you want to insert. Learn inventor basic tutorial for beginner how to insert image in drawing fast and easyinventorhowtoinsertimage. This will help with surface modelling and also working from a sketch to help you create the model you want from image references.
In Paint choose the Paste From command and browse to select the source image file. In command line type PASTESPEC press ENTER. Everyone knows that you can insert an image in an AutoCAD drawing with an x-ref.
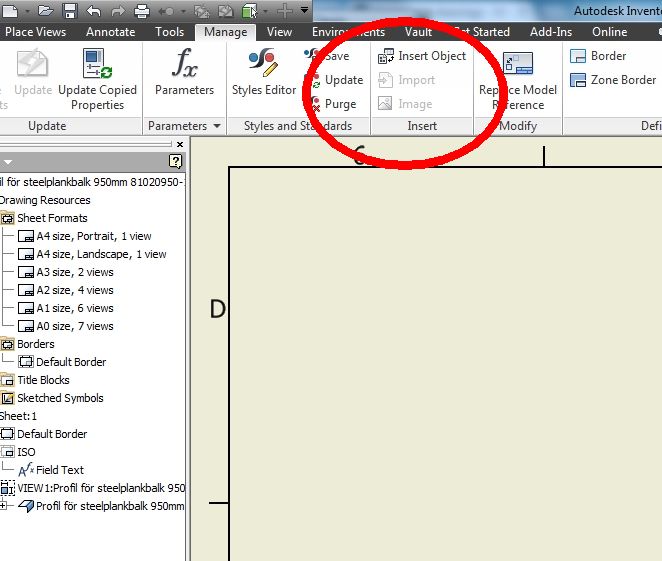
This is how you would insert images in to Auto desk Inventor. In the Select Image File dialog box select a file name from the list or enter the name of the image file in the File Name box. On the ribbon click Manage tab Insert panel Insert Object.
Exit from Paint and return to AutoCAD. Locate the image to add and then. Now go back to AutoCAD and simply Paste.
Then clipboard the image into the box and pull-to-fit the corners of the image to fit inside. The main drawback with using a x-reference is that the link must remain. Click the drawing sketchIf necessary adjust the position of the image.
Then just pray that the next time you open the IDW the unconstrained parts of the views dont just float away. Type command IMAGE on the Auto CAD command box and then press Enter. The cursor is attached to the upper left corner of the image.
Remember the Link box is checked 100 of the time and you need to. Edit your TB then in the Sketch Tab choose Insert Image and uncheck the Link box before placing it. Right click on the image.
In command line type PASTESPEC press ENTER. Use CTRLC or the Copy button to place the partial image or whole image to the internal clipboard. Save the image you want to trace on to your hard drive.
Click anywhere in your drawing to place the image file. Start in a drawing sketch. A Dialogue box will appear on the.
Generally this method will give you this dialog box. Select Paintbursh Picture as the Object Type and click OK. I right-click on the ANSI Large title block under the Drawing Resources folder and select Edit.
Select Use Image Alpha.

Autodesk Inventor Two Minute Tip Insert Sketch Image Youtube

Autodesk Inventor Drawing Productivity Sketch Symbols Youtube

Inserting Vs Embedding Images In Title Blocks In Autodesk Inventor Inventor Tales
Solved Inserting Images Into Idw Drawings Autodesk Community Inventor

Autodesk Inventor Inserting Image And Creating Decal Youtube

Insert Pdf Into A Drawing Dwg Or Idw Autodesk Community Inventor
Solved Inserting Images Into Idw Drawings Autodesk Community Inventor

Quick Tip Insert Image Youtube
0 comments
Post a Comment